
개발자입니다
[비트캠프] 33일차(7주차3일) - UI 다루기(Bootstrap vs jQuery) 본문
[비트캠프] 33일차(7주차3일) - UI 다루기(Bootstrap vs jQuery)
끈기JK 2022. 12. 21. 11:15
UI 다루는 방법 비교(Bootstrap vs jQuery)
UI 컴포넌트를 다루는 방법 - 버튼 UI
HTML에 <style> 에 직접 스타일 작성한다.
<!-- ex07\exam06-1.html -->

	<style>
        .btn {
            border: 1px solid gray;
            display: inline-block;
            padding: 5px 10px;
            border-radius: 3px;
            background-color: #0000ff;
            color: white;
            box-shadow: 1px 1px 2px 0px gray;
        }

        .btn:active {
            background-color: #0000c9;
            box-shadow: 0px 0px 0px 0px gray;
        }

        .btn:hover {
            cursor: default;
        }
    </style>
</head>

<body>

    <div class="btn">버튼</div>
UI 컴포넌트를 다루는 방법 - CSS로 설정하기
CSS 파일 별도로 분리해서 link를 건다.
    <link rel="stylesheet" href="exam06.css">
</head>

<body>

    <div class="btn">버튼</div>
// exam06.css
.btn {
border: 1px solid gray;
display: inline-block;
padding: 5px 10px;
border-radius: 3px;
background-color: #0000ff;
color: white;
box-shadow: 1px 1px 2px 0px gray;
}
.btn:active {
background-color: #0000c9;
box-shadow: 0px 0px 0px 0px gray;
}
.btn:hover {
cursor: default;
}
UI 컴포넌트를 다루는 방법 - CSS로 설정하기 II
bootstrap을 link로 걸어 bootstrap에서 지정한 class 이름으로 설정시 스타일 지정할 수 있다.
<link href="https://cdn.jsdelivr.net/npm/bootstrap@5.2.3/dist/css/bootstrap.min.css" rel="stylesheet"
    integrity="sha384-rbsA2VBKQhggwzxH7pPCaAqO46MgnOM80zW1RWuH61DGLwZJEdK2Kadq2F9CUG65" crossorigin="anonymous">
<script src="https://cdn.jsdelivr.net/npm/bootstrap@5.2.3/dist/js/bootstrap.bundle.min.js"
    integrity="sha384-kenU1KFdBIe4zVF0s0G1M5b4hcpxyD9F7jL+jjXkk+Q2h455rYXK/7HAuoJl+0I4"
    crossorigin="anonymous"></script>
</head>

<body>

    <div class="btn btn-secondary">버튼</div>
UI 컴포넌트를 다루는 방법 - CSS로 설정하기 III
대부분 웹사이트 직접 링크걸지 않고 bootstrap 파일 다운받아 링크 건다.
<link href="node_modules/bootstrap/dist/css/bootstrap.min.css" rel="stylesheet">
<script src="node_modules/bootstrap/dist/js/bootstrap.bundle.min.js"></script>
</head>
<body>

<div class="btn btn-warning">버튼</div>
명령 프롬프트에서 소스 다운 받는다. html 있는 폴더에서 아래처럼 입력한다.
PS C:\Users\bitcamp\git\bitcamp-ncp\javascript\ex07> npm install bootstrap@5.2.3 --save
UI 컴포넌트를 다루는 방법 - JavaScript로 설정하기
javascript에서 'btn' class를 추가시켜서 css에서 지정한 class의 스타일로 변경한다.
    <link rel="stylesheet" href="exam06.css">
</head>

<body>

    <div id="btn1">버튼</div>

    <script src="jQuery-16.js"></script>
    <script src="exam06.js"></script>
    <script>
        "use strict"

        $('#btn1').button();
// exam06.js
// 기존 jQuery 에 기능 추가
ElementBox.prototype.button = function () {
this.el.forEach((e) => {
e.classList.add('btn');
});
};
UI 컴포넌트를 다루는 방법 - JavaScript로 설정하기 II
css를 링크를 jquery 사이트에 건다.
$ 사용을 위해 jqeury 사이트에서 기본 라이브러리 링크 건다.
button() 으로 버튼화 하기 위해서는 jqeury 사이트에서 button() 관련 소스 링크 건다.
    <link rel="stylesheet" href="https://code.jquery.com/ui/1.13.2/themes/base/jquery-ui.css">
</head>

<body>

    <div id="btn1">버튼</div>

    <script src="https://ajax.googleapis.com/ajax/libs/jquery/3.6.1/jquery.min.js"></script>
    <script src="https://code.jquery.com/ui/1.13.2/jquery-ui.js"></script>  <!-- 기존 jQuery에 메서드 추가 -->
    <script>
        "use strict"

        $('#btn1').button();
CDN 방식으로 라이브러리 파일 지정
CDN : Content Delivery Network : 외부사이트에 있는 Content를 연결
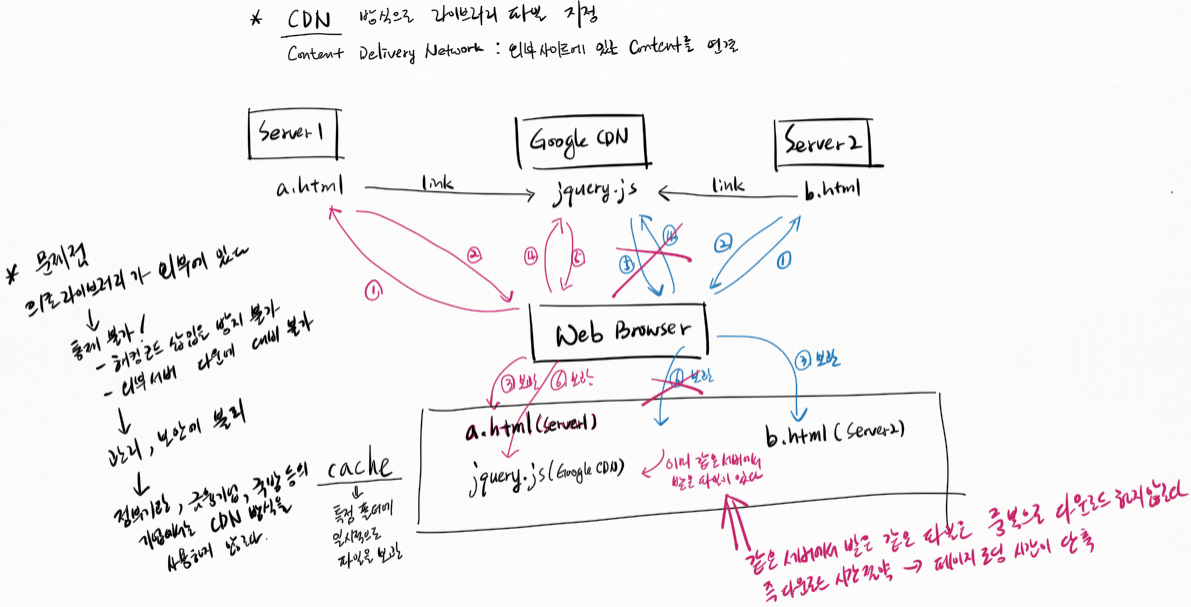
Web Browser가 ① html 요청을 Server1에 하고 a.html을 ② 응답 받는다. a.html을 cache(특정 폴더에 일시적으로 파일을 보관)에 ③ 보관 한다. a.html에는 link가 걸려있는데 Google CDN에 jquery.js 이다. Google CDN에 ④ 요청하고 ⑤ 응답받는다. 받은 jquery.js(Google CDN) 파일을 cache에 ⑥ 보관한다.
Web Browser가 ① html 요청을 Server2에 하고 b.html을 ② 응답 받는다. cache에 ③ 보관한다. b.html에 걸려있는 Google CDN의 jqeury.js 파일을 ④ 요청 ⑤ 응답 ⑥ 보관하지 않는다. 이미 같은 Google 서버에서 받은 파일이 있다.
같은 서버에서 받은 같은 파일은 중복으로 다운로드 하지 않는다. 즉 다운로드 시간 절약하여 페이지 로딩 시간이 단축된다.
*문제점 : 의존 라이브러리가 외부에 있다.
→ 통제 불가!
- 해킹코드 삽입을 방지 불가
- 외부 서버 다운에 대비 불가
→ 관리, 보안에 불리
→ 정부 기관, 금융, 국방 등의 기업에서는 CDN 방식을 사용하지 않는다.
외부 라이브러리 관리
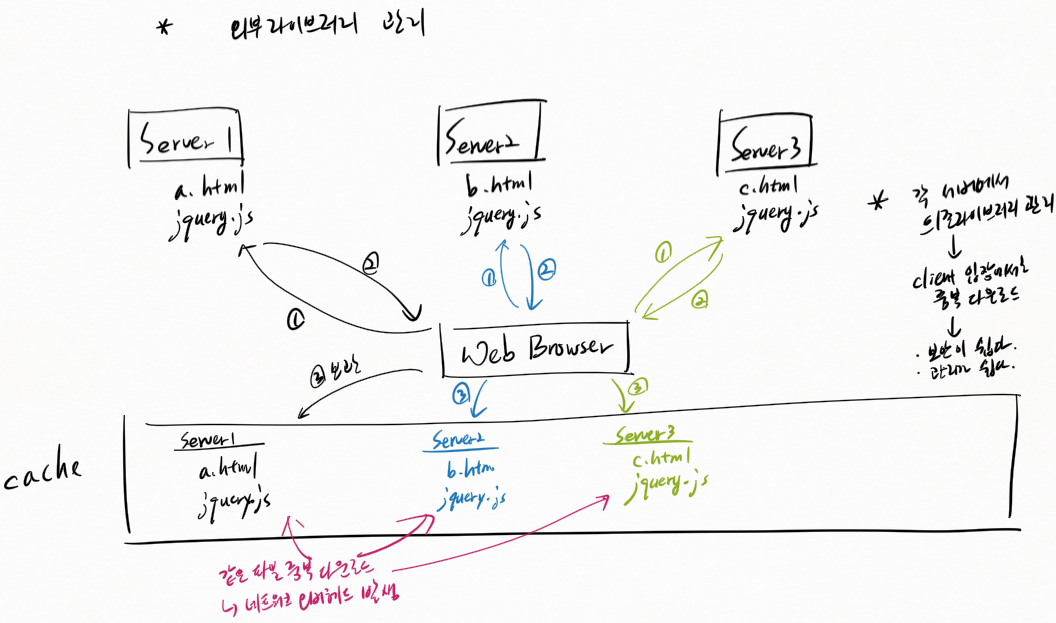
Server1에 a.html과 jquery.js를 보관한다. Web Browser가 ① 요청하면 ② 응답받아 ③ 보관을 cache에 한다. Server1의 a.html, jquery.js로 저장한다.
Server2에 b.html과 jquery.js를 보관한다. Web Browser가 ① 요청하면 ② 응답받아 ③ 보관을 cache에 한다. Server2의 b.html, jquery.js로 저장한다.
Server3에 c.html과 jquery.js를 보관한다. Web Browser가 ① 요청하면 ② 응답받아 ③ 보관을 cache에 한다. Server3의 c.html, jquery.js로 저장한다.
장점 : 각 서버에서 의존 라이브러리 관리한다.
client 입장에서는 중복 다운로드 이다. 하지만 보안이 쉽고, 관리가 쉽다.
단점 : 같은 파일 중복 다운로드로 네트워크 오버헤드 발생한다.
외부 라이브러리 다운로드
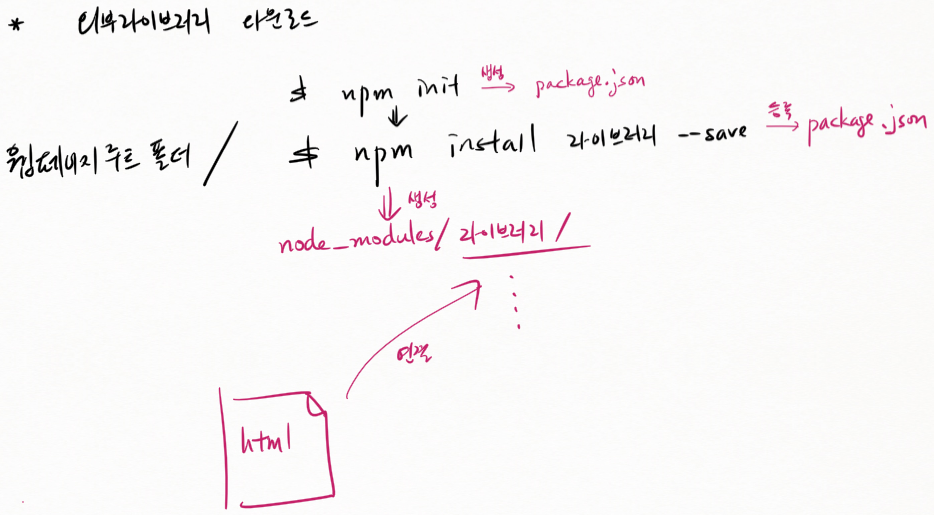
외부 라이브러리 다운로드 방법이다.
사전에 $ npm init 입력한 상태여야한다. 입력하면 package.json 생성된다.
웹 페이지 루트폴더에서 $ npm install 라이브러리 --save 입력한다. 그러면 package.json에 등록된다.
그러면 node_modules/라이브러리/ 가 생성되고 html 에서 이 파일로 연결한다.
UI 컴포넌트를 다루는 방법 - JavaScript로 설정하기 III
먼저 명령 프롬프트에서 소스 다운 받는다.
html 있는 폴더에서 아래처럼 입력한다. 엔터엔터 한다.
PS C:\Users\bitcamp\git\bitcamp-ncp\javascript\ex07> npm init아래처럼 입력해서 jqeury 를 package.json에 저장한다.
PS C:\Users\bitcamp\git\bitcamp-ncp\javascript\ex07> npm install jquery --savejquery-ui 저장은 아래처럼 입력한다.
PS C:\Users\bitcamp\git\bitcamp-ncp\javascript\ex07> npm install jquery-ui --save
CDN으로 소스 받을 경우 CDN이 불안정하면 내 웹사이트가 불안정해진다. 소스를 직접 받아 링크를 건다.
    <link rel="stylesheet" href="node_modules/jquery-ui/dist/themes/base/jquery-ui.css">
</head>

<body>

    <div id="btn1">버튼</div>

    <script src="node_modules/jquery/dist/jquery.min.js"></script>
    <script src="node_modules/jquery-ui/dist/jquery-ui.js"></script> <!-- 기존 jQuery에 메서드 추가 -->
    <script>
        "use strict"

        $('#btn1').button();
외부라이브러리 활용 - SweetAlert2
https://sweetalert2.github.io/ 에 사용 방법 나와있다.
설치는 아래처럼 한다.
PS C:\Users\bitcamp\git\bitcamp-ncp\javascript\ex07> npm install sweetalert2 --save
click시 Swal.fire() 가 실행된다.
<body>
    <button id="btn1">일반 알림창 띄우기</button>
    <button id="btn2">SweetAlert2 알림창 띄우기</button>

    <script src="node_modules/jquery/dist/jquery.min.js"></script>
    <script src="node_modules/sweetalert2/dist/sweetalert2.all.min.js"></script>
    <script>
        "use strict"

        $('#btn1').click(() => {
            window.alert('알림창입니다!')
        });

        $('#btn2').click(() => {
            Swal.fire({
                title: 'Error!',
                text: 'Do you want to continue',
                icon: 'error',
                confirmButtonText: 'Cool'
            })
        });
load 이벤트 - 사용 전
<thead>가 있는 상태에서 append 되는 것이라 화면 깜빡임이 심하다.
<table border="1">
<thead>
    <tr><th>번호</th><th>제목</th><th>작성자</th><th>조회수</th></tr>
</thead>
<tbody>
</tbody>
</table>

<hr>
<p>비트캠프@2022</p>

<script src="https://ajax.googleapis.com/ajax/libs/jquery/3.6.1/jquery.min.js"></script>
<script>
let tbody = $("tbody");
$.getJSON("http://localhost:3000/exam04-3", (result) => {
    result.forEach((b) => {
        $("<tr>")
        .html("<td>" + b.no + "</td>" +
                "<td>" + b.title + "</td>" +
                "<td>" + b.writer + "</td>" +
                "<td>" + b.viewCnt + "</td>")
        .appendTo(tbody);
    });
});
</script>
load 이벤트 - 사용 전 II
body 태그의 콘텐츠가 로딩 되기도 전에 tbody 를 찾으면 해당 태그는 존재하지 않는다.
<script src="https://ajax.googleapis.com/ajax/libs/jquery/3.6.1/jquery.min.js"></script>
<script>
let tbody = $("tbody"); // 리턴 값은 tbody 태그가 들어 있지 않는 객체이다.

$.getJSON("http://localhost:3000/exam04-3", (result) => {
    result.forEach((b) => {
        $("<tr>")
        .html("<td>" + b.no + "</td>" +
                "<td>" + b.title + "</td>" +
                "<td>" + b.writer + "</td>" +
                "<td>" + b.viewCnt + "</td>")
        .appendTo(tbody);
    });
});
</script>
</head>

<body>

<table border="1">
<thead>
    <tr><th>번호</th><th>제목</th><th>작성자</th><th>조회수</th></tr>
</thead>
<tbody>
</tbody>
</table>

<hr>
<p>비트캠프@2022</p>
load 이벤트 - window.onload
body 태그의 콘텐츠가 모두 로딩된 후에 작업하기
=> window의 load 이벤트가 발생했을 때 작업하면 된다.
window.load 이벤트:
- HTML을 실행(JavaScript 포함)하여 DOM Tree를 완성하고, HTML에 연결된 CSS, Image 등의 파일을 모두 다운로드 한 후에 화면에 콘텐츠 출력을 완료할 때 발생한다.
<script src="https://ajax.googleapis.com/ajax/libs/jquery/3.6.1/jquery.min.js"></script>
<script>

window.onload = () => {

    // load 이벤트가 발생했을 때는 이미 HTML 모든 콘텐츠가 로딩되어 화면에 출력된 상태이다.
    // 따라서 tbody 태그를 찾을 수 있다.
    let tbody = $("tbody");

    $.getJSON("http://localhost:3000/exam04-3", (result) => {
        result.forEach((b) => {
            $("<tr>")
            .html("<td>" + b.no + "</td>" +
                    "<td>" + b.title + "</td>" +
                    "<td>" + b.writer + "</td>" +
                    "<td>" + b.viewCnt + "</td>")
            .appendTo(tbody);
        });
    });
};

</script>
</head>

<body>
<h1>load 이벤트 - window.onload</h1>

<table border="1">
<thead>
    <tr><th>번호</th><th>제목</th><th>작성자</th><th>조회수</th></tr>
</thead>
<tbody>
</tbody>
</table>

<hr>
<p>비트캠프@2022</p>
load 이벤트 - $(document).ready(handler)
$(document).ready(handler)
- window.onload 와 같다.
<script src="https://ajax.googleapis.com/ajax/libs/jquery/3.6.1/jquery.min.js"></script>
<script>

$(document).ready(() => {
    let tbody = $("tbody");

    $.getJSON("http://localhost:3000/exam04-3", (result) => {
        result.forEach((b) => {
            $("<tr>")
            .html("<td>" + b.no + "</td>" +
                    "<td>" + b.title + "</td>" +
                    "<td>" + b.writer + "</td>" +
                    "<td>" + b.viewCnt + "</td>")
            .appendTo(tbody);
        });
    });
});

</script>
</head>

<body>

<table border="1">
<thead>
    <tr><th>번호</th><th>제목</th><th>작성자</th><th>조회수</th></tr>
</thead>
<tbody>
</tbody>
</table>

<hr>
<p>비트캠프@2022</p>
load 이벤트 - 콘텐츠를 변경하는 방법1
tbody에 들어갈 내용을 모두 만든 후에 한 번에 tbody의 콘텐츠를 변경한다.
<style>
table {
    min-width: 500px;
    min-height: 250px;
}
thead > tr > th:nth-child(1) {
    width: 50px;
}
thead > tr > th:nth-child(2) {
    width: 250px;
}
thead > tr > th:nth-child(3) {
    width: 100px;
}
thead > tr > th:nth-child(4) {
    width: 100px;
}
</style>
<script src="https://ajax.googleapis.com/ajax/libs/jquery/3.6.1/jquery.min.js"></script>
<script>

$(document).ready(() => {
    let tbody = $("tbody");

    let contents = "";
    $.getJSON("http://localhost:3000/exam04-3", (result) => {
        result.forEach((b) => {
            contents += `<tr><td>${b.no}</td><td>${b.title}</td><td>${b.writer}</td><td>${b.viewCnt}</td></tr>\n`;
        });
        tbody.html(contents);
    });
});

</script>
</head>

<body>
<h1>load 이벤트 - 콘텐츠를 변경하는 방법1</h1>

<table border="1">
<thead>
    <tr><th>번호</th><th>제목</th><th>작성자</th><th>조회수</th></tr>
</thead>
<tbody>
</tbody>
</table>

<hr>
<p>비트캠프@2022</p>
load 이벤트 - 콘텐츠를 변경하는 방법2
데이터가 들어갈 tr 태그를 미리 만들어 놓고 그 자리에 데이터만 교체한다.
<style>
table {
    min-width: 500px;
    min-height: 250px;
}
thead > tr > th:nth-child(1) {
    width: 50px;
}
thead > tr > th:nth-child(2) {
    width: 250px;
}
thead > tr > th:nth-child(3) {
    width: 100px;
}
thead > tr > th:nth-child(4) {
    width: 100px;
}
</style>
<script src="https://ajax.googleapis.com/ajax/libs/jquery/3.6.1/jquery.min.js"></script>
<script>

$(document).ready(() => {
    let trList = $("tbody > tr");
    $.getJSON("http://localhost:3000/exam04-3", (result) => {
        result.forEach((b, index) => {
            let tdList = trList[index].children;
            tdList[0].innerHTML = b.no;
            tdList[1].innerHTML = b.title;
            tdList[2].innerHTML = b.writer;
            tdList[3].innerHTML = b.viewCnt;
        });
    });
});

</script>
</head>

<body>
<h1>load 이벤트 - 콘텐츠를 변경하는 방법2</h1>

<table border="1">
<thead>
    <tr><th>번호</th><th>제목</th><th>작성자</th><th>조회수</th></tr>
</thead>
<tbody>
    <tr><td></td><td></td><td></td><td></td></tr>
    <tr><td></td><td></td><td></td><td></td></tr>
    <tr><td></td><td></td><td></td><td></td></tr>
    <tr><td></td><td></td><td></td><td></td></tr>
    <tr><td></td><td></td><td></td><td></td></tr>
</tbody>
</table>

<hr>
<p>비트캠프@2022</p>
load 이벤트 - $(handler)
$(handler)
- $(document).ready(handler) 코드의 단축 문법이다.
- $(document).ready(handler) 함수는 deprecated 되었다.
<script src="https://ajax.googleapis.com/ajax/libs/jquery/3.6.1/jquery.min.js"></script>
<script>

$(() => {
    let tbody = $("tbody");

    $.getJSON("http://localhost:3000/exam04-3", (result) => {
        result.forEach((b) => {
            $("<tr>")
            .html("<td>" + b.no + "</td>" +
                    "<td>" + b.title + "</td>" +
                    "<td>" + b.writer + "</td>" +
                    "<td>" + b.viewCnt + "</td>")
            .appendTo(tbody);
        });
    });
});

</script>
</head>

<body>
<h1>load 이벤트 - $(handler)</h1>

<table border="1">
<thead>
    <tr><th>번호</th><th>제목</th><th>작성자</th><th>조회수</th></tr>
</thead>
<tbody>
</tbody>
</table>

<hr>
<p>비트캠프@2022</p>
load 이벤트 - 실행 순서 확인
ready()와 onload 로 등록한 함수는 jQuery의 버전에 따라 실행 순서가 다르다.
=> 따라서 한 가지 방법을 사용하라!
    <script src="node_modules/jquery/dist/jquery.min.js"></script>

    <script>
        $(() => {
            console.log("ready() 호출됨! 111");
        });

        $(document).ready(() => {
            console.log("ready() 호출됨! 222");
        });

        $(() => {
            console.log("ready() 호출됨! 333");
        });

        window.onload = function () {
            console.log("load 이벤트 발생!");
        }
    </script>
</head>

<body>
    <script>
        console.log("1111");
    </script>

    <script src="exam08.js"></script>

    <script>
        console.log("2222");
    </script>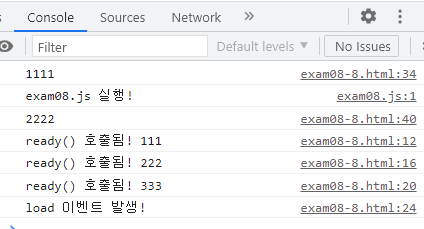
조언
*책상에 프론트엔드 개발자, 백엔드 개발자 로드맵이 붙어있어야 한다.
과제
주제: 공공 데이터를 이용한 웹서비스 개발
기간: 2022-12-21 16:30 ~ 2022-12-22 16:00
발표: 2022-12-22 16:00 ~ 18:00
발표내용: 프로젝트 소개 및 시연
'네이버클라우드 AIaaS 개발자 양성과정 1기 > Javascript' 카테고리의 다른 글
| [비트캠프] 35일차(7주차5일) - Javascript(Promise, fetch) (31) | 2022.12.23 |
|---|---|
| [비트캠프] 34일차(7주차4일) - 해커톤: 공공데이터 이용 웹서비스 만들기 (0) | 2022.12.22 |
| [비트캠프] 32일차(7주차2일) - jQuery(자바스크립트 라이브러리 만들기2, minify) (0) | 2022.12.20 |
| [비트캠프] 31일차(7주차1일) - jQuery(자바스크립트 라이브러리 만들기) (0) | 2022.12.19 |
| [비트캠프] 30일차(6주차5일) - AJAX(제약, CORS, 프록시 기법, 동기/비동기 요청, 기상청 API 가져오기) (0) | 2022.12.16 |


