
개발자입니다
[비트캠프] 26일차(6주차1일) - Javascript(객체, 프로퍼티, 생성자) 본문
[비트캠프] 26일차(6주차1일) - Javascript(객체, 프로퍼티, 생성자)
끈기JK 2022. 12. 12. 11:25
객체 생성
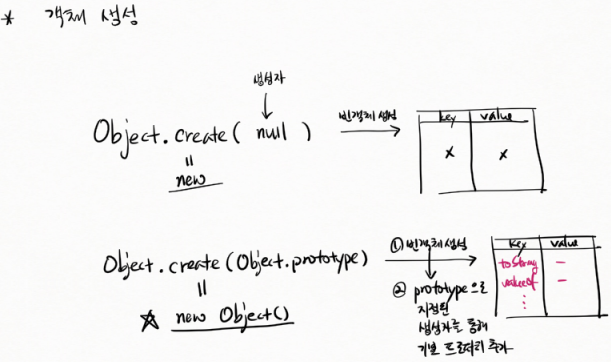
그림 윗부분 Object.create(null) 에서 create는 new와 같다. 괄호 안의 null 부분은 생성자이다. 해당 명령어로 빈 객체 생성된다.
그림 아랫부분 Object.create(Object.prototype) 에서 create는 new Object() 와 같다. 이 명령어로 ① 빈 객체 생성 ② prototype으로 지정된 생성자를 통해 기본 프로퍼티 추가된다.
생성자 (constructor)
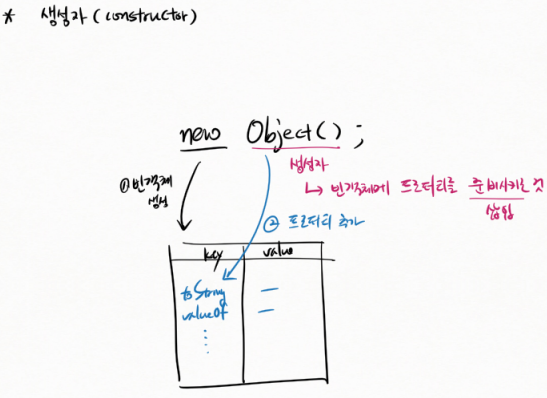
new로 ① 빈 객체 생성한다. Object() 는 생성자로 빈 객체에 프로퍼티를 준비시키는 것(삽입)을 한다. Object() 로 ② 프로퍼티 추가되어 toString, valueOf 등등 추가된다.
객체 - 프로퍼티 추가
생성자를 이용하여 기본 객체를 준비한 후에 필요한 프로퍼티(변수와 함수, 객체)를 추가할 수 있다.
// ex04\exam02.html
var obj = new Object();

console.log(obj);

// 기본 객체 안에는 다음의 함수들이 들어 있다.
console.log(obj.toString());
console.log(obj.valueOf());
console.log(obj.hasOwnProperty("toString")); // false
console.log(obj.hasOwnProperty("hashCode")); // false
// => hasOwnProperty()는 기본 객체를 생성한 이후에
//    개발자가 추가한 프로퍼티인지 검사한다.

console.log("----------------------");

// 이렇게 준비된 객체에 프로퍼티를 추가하고 싶다면 다음의 문법을 사용하라!
// 객체.프로퍼티명 = 값;
// 객체["프로퍼티명"] = 값;
// 객체['프로퍼티명'] = 값;

// 객체에 값을 저장할 수 있다.
obj.title = "제목입니다.";
obj["content"] = "내용입니다.";
obj['viewCount'] = 120;

// 물론 그 값으로 함수 객체의 주소를 저장할 수 있다.
function f1(a, b) {
  return a + b;
}
obj.plus1 = f1; // 함수명은 그 자체가 함수 객체의 주소를 갖고 있는 변수이다.

obj.plus2 = function(a, b) {
  return a + b;
};

obj.plus3 = (a, b) => console.log("합계=", a + b); // arrow function

console.log(obj.hasOwnProperty("title"));  // true
console.log(obj.hasOwnProperty("content")); // true
console.log(obj.hasOwnProperty("viewCount")); // true
console.log(obj.hasOwnProperty("plus1")); // true
console.log(obj.hasOwnProperty("plus2")); // true
console.log(obj.hasOwnProperty("plus3")); // true

console.log("-------------------------");

console.log(obj["title"]);
console.log(obj['content']);
console.log(obj.viewCount);
console.log(obj.plus1(100, 200)); // 리턴 값 출력
console.log(obj["plus2"](100, 200)); // 리턴 값 출력
obj['plus3'](100, 200);
hasOwnProperty("프로퍼티명")
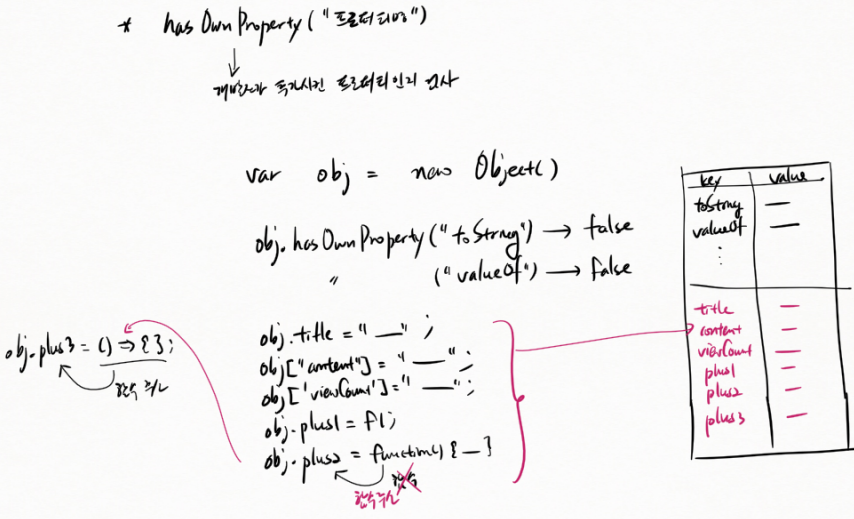
hasOwnProperty("프로퍼티명") 명령어 사용하면 개발자가 추가시킨 프로퍼티인지 검사한다.
var obj = new Object() 입력 후
obj.hasOwnProperty("toString") 은 false
obj.hasOwnProperty("valueOf") 는 false 가 나온다.
아래 obj.title ~ obj.plus2 까지 입력하면 obj 객체 메모리에 프로퍼티가 추가된다.
obj.plus2 = function() { - } 하게되면 plus2 라는 변수명에 함수가 아닌 함수주소가 들어간다.
obj.plus3 = () => { } ; 하게되면 함수 주소가 plus3 에 들어간다.
객체 - 프로퍼티 추가 II
일반적인 값 뿐만 아니라, 함수와 객체까지 저장할 수 있다.
var obj = new Object();

obj.name = "홍길동";
obj.f1 = () => console.log("f1()....");

var obj2 = new Object();
obj2.v1 = 100;
obj2.v2 = true;
obj2.v3 = "문자열";
obj2.v4 = () => console.log("v4()....");

// 이렇게 프로퍼티의 값으로 다른 객체의 주소를 저장할 수 있다.
obj.other = obj2;

// 객체의 프로퍼티 값 꺼내기
console.log(obj.name);
console.log(obj.other.v1); // 자바의 OGNL(Object Graph Navigation Language)와 비슷하다.
console.log(obj.other.v2);
console.log(obj.other.v3);

// 객체의 함수 호출
obj.f1();
obj.other.v4();
객체가 다른 객체를 포함하는 경우

let obj = new Object()
obj.name = "-";
obj.f1 = () => { - }; 하게 되면 객체가 생성되고 주소 200이 obj에 저장된다. name, f1 프로퍼티가 추가되고 f1 은 400의 주소가 저장된다. 400의 주소에는 또 다른 객체가 생성된다.
let obj2 = new Object(); ~ obj2.v4 = O; 하게되면 객체가 생성되고 주소 700을 갖는다.
obj.other = obj2 하게되면 obj에 other가 저장되고 obj2의 객체주소 700이 other에 저장된다.
객체 - 객체에 소속된 함수가 같은 객체에 소속된 다른 멤버 사용하기
같은 객체에 소속된 멤버(변수나 함수, 객체)를 사용하려면 참조변수 this를 반드시 붙여야 한다.
=> 자바는 생략해도 됐지만, 자바스크립트는 생략하면 안 된다.
var obj = new Object();

obj.name = "홍길동";
obj.kor = 100;
obj.eng = 90;
obj.math = 80;

// toString()은 이미 객체에 들어 있는 함수이다.
// 다음은 기존 함수를 덮어 쓴다.
obj.toString = function () {
    // 자바와 달리 객체의 프로퍼티 변수를 사용할 때는 반드시 this를 붙여야 한다.생략하면 안된다.
    // name에 this를 빼면 함수 내부 프로퍼티 변수 중 name이 있는지 찾아본다.
    // 없으면 window 객체의 기본 프로퍼티 변수인 name을 불러온다.
    return name + "," + this.kor + "," + this.eng + "," + this.math;
};


console.log(obj.toString());

console.log(obj);
// 자바에서는 println()에 객체 주소를 주면
// println()에서 내부적으로 해당 객체의 toString() 호출한다.
// 그리고 그 리턴 값을 출력한다.
// 그러나 자바스크립트의 console.log()는
// 자바와 달리 toString()의 리턴 값을 출력하지 않는다.

obj.sum = function () {
    return this.kor + this.eng + this.math; // 항상 같은 객체의 멤버를 가리킬 때는 this를 붙여야 한다.
};

obj.aver = function () {
    return this.sum() / 3; // 항상 같은 객체의 멤버를 가리킬 때는 this를 붙여야 한다.
};

console.log(obj.sum(), obj.aver());
객체와 this
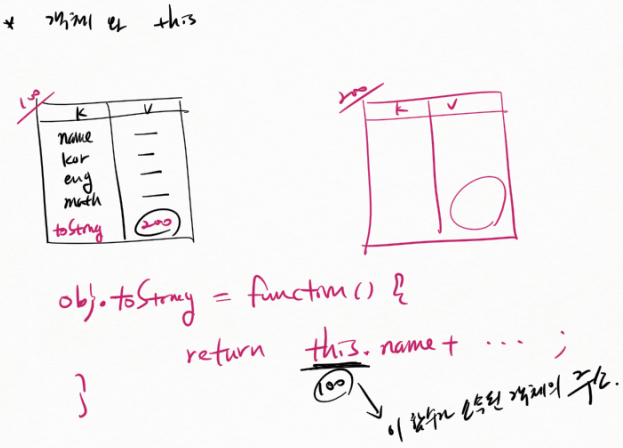
this는 그 함수가 소속된 객체의 주소를 가리킨다. this에 이 함수가 소속된 객체의 주소가 저장된다.
객체 - {}을 이용하여 객체 생성하기
{}은 기본 객체를 생성하는 단축 문법이다.
=> 객체 리터럴(object literal) 문법
즉 new Object()와 같다.
var obj = {}; //new Object();

obj.name = "홍길동";
obj.kor = 100;
obj.eng = 90;
obj.math = 80;
obj.sum = function () {
    return this.kor + this.eng + this.math; // 항상 같은 객체의 멤버를 가리킬 때는 this를 붙여야 한다.
};
obj.aver = function () {
    return this.sum() / 3; // 항상 같은 객체의 멤버를 가리킬 때는 this를 붙여야 한다.
};

console.log(obj.sum(), obj.aver());
console.log(obj);
객체 - {}을 이용하여 기본 객체에 프로퍼티 추가하기
{}은 기본 객체를 생성할 뿐만 아니라 프로퍼티도 바로 추가할 수 있다.
var obj = {
	"name": "홍길동",
	'kor': 100,
	eng: 90,
	math:80,
	sum: function() {
	    return this.kor + this.eng + this.math;
	},
	aver: function() {
	    return this.sum() / 3;
	}
};

console.log(obj.sum(), obj.aver());
console.log(obj);
객체 - {}을 이용하여 기본 객체에 함수를 추가하는 또 다른 방법
함수를 만들때 function을 안붙여도 된다.
var obj = {
	name: "홍길동",
	kor: 100,
	eng: 90,
	math:80,
	/*
  sum: function() {
	  return this.kor + this.eng + this.math;
  },
  */
	sum() {
	    return this.kor + this.eng + this.math;
	},
	aver() {
	    return this.sum() / 3;
	}
};

console.log(obj.sum(), obj.aver());
console.log(obj);
객체 - {} 문법과 arrow function
arrow fuction을 객체의 프로퍼티로 등록할 때,
=> arrow function에서 this는 소속된 객체가 아니라 window 객체를 가리킨다.
=> 그에 비해 일반 함수나 익명 함수에서 사용하는 this는 자신이 소속된 객체를 가리킨다.
var obj = {
    name: "홍길동",
    kor: 100,
    eng: 90,
    math: 80,
    sum: () => this.kor + this.eng + this.math,
    aver: () => this.sum() / 3,
    test1: function () { console.log(this); },
    test2() { console.log(this); },
    test3: () => console.log(this)
};

// console.log(obj.sum()); // this 즉 window 객체에 kor, eng, math라는 변수가 없기 때문에
// 리턴 값은 NaN이다.
// console.log(obj.aver()); // 마찬가지로 this 즉 window 객체에 sum() 함수가 없기 때문에
// 함수 실행 중에 오류가 발생한다.


obj.test1();
obj.test2();
obj.test3();  // arrow function이라 window 객체 나옴
결론!
=> 객체의 멤버 함수로 등록할 때는 arrow function을 사용하지 말라!
=> 물론 객체의 다른 멤버를 사용하지 않는다면 arrow function을 사용해도 된다.
객체 - 객체 생성과 초기화 I
1) 낱개의 레퍼런스 변수 선언
자바스크립트는 객체를 생성할 때 기본 객체를 준비한 후
기본 객체에 프로퍼티를 추가하는 방식으로 객체를 초기화시킨다.
var s1 = new Object();
s1.name = "홍길동";
s1.kor = 100;
s1.eng = 100;
s1.math = 100;
s1.sum = s1.kor + s1.eng + s1.math;
s1.aver = s1.sum / 3;

var s2 = new Object();
s2.name = "임꺽정";
s2.kor = 90;
s2.eng = 90;
s2.math = 90;
s2.sum = s2.kor + s2.eng + s2.math;
s2.aver = s2.sum / 3;

var s3 = new Object();
s3.name = "유관순";
s3.kor = 80;
s3.eng = 80;
s3.math = 80;
s3.sum = s3.kor + s3.eng + s3.math;
s3.aver = s3.sum / 3;

console.log(s1.name, s1.kor, s1.eng, s1.math, s1.sum, s1.aver);
console.log(s2.name, s2.kor, s2.eng, s2.math, s2.sum, s2.aver);
console.log(s3.name, s3.kor, s3.eng, s3.math, s3.sum, s3.aver);
아래부터 코드 개선 내용이다.
객체 - 객체 생성과 초기화 II
2) 레퍼런스 배열 사용
배열을 이용하여 여러 개의 객체를 다루기
var scores = []; //new Array();
scores[0] = new Object();
scores[0].name = "홍길동";
scores[0].kor = 100;
scores[0].eng = 100;
scores[0].math = 100;
scores[0].sum = scores[0].kor + scores[0].eng + scores[0].math;
scores[0].aver = scores[0].sum / 3;

scores[1] = {}; // new Object();
scores[1].name = "임꺽정";
scores[1].kor = 90;
scores[1].eng = 90;
scores[1].math = 90;
scores[1].sum = scores[1].kor + scores[1].eng + scores[1].math;
scores[1].aver = scores[1].sum / 3;

scores[2] = {}; // new Object();
scores[2].name = "임꺽정";
scores[2].kor = 80;
scores[2].eng = 80;
scores[2].math = 80;
scores[2].sum = scores[2].kor + scores[2].eng + scores[2].math;
scores[2].aver = scores[2].sum / 3;

for (var score of scores) {
    console.log(score.name, score.kor, score.eng, score.math, score.sum, score.aver);
}
객체 - 객체 생성과 초기화 III
3) 함수를 이용해 객체 생성
함수를 이용하여 객체를 초기화시키기
참고: 팩토리 메서드 패턴(factory method design patterns)
=> 함수를 통해 객체를 생성하는 기법
=> 객체 생성 과정이 복잡할 경우 직접 객체를 생성하고 초기화시키는 것이 코드를 더 간결하게 만든다.
function createScore(name, kor, eng, math) {
	const obj = new Object();
	obj.name = name;
	obj.kor = kor;
	obj.eng = eng;
	obj.math = math;
	obj.sum = kor + eng + math;
	obj.aver = obj.sum / 3;
	return obj;
}

var scores = []; // new Array();
scores[0] = createScore("홍길동", 100, 100, 100);
scores[1] = createScore("임꺽정", 90, 90, 90);
scores[2] = createScore("유관순", 80, 80, 80);

for (var score of scores) {
    console.log(score.name, score.kor, score.eng, score.math, score.sum, score.aver);
}

console.log("---------------------------------------------");

// 아직 부족한 점!
// => 특정 과목의 점수가 바뀌면 다시 합계와 평균을 계산해야 한다.
scores[2].kor = 100;
scores[2].sum = scores[2].kor + scores[2].eng + scores[2].math;
scores[2].aver = scores[2].sum / 3;

for (var score of scores) {
    console.log(score.name, score.kor, score.eng, score.math, score.sum, score.aver);
}
객체 - 객체 생성과 초기화 IV
4) 객체 프로퍼티에 함수 저장
객체의 값을 다루는 함수를 객체에 추가한다.
function createScore(name, kor, eng, math) {
	var obj = new Object();
	obj.name = name;
	obj.kor = kor;
	obj.eng = eng;
	obj.math = math;
	obj.sum = function() {
		return this.kor + this.eng + this.math;
	};
	obj.aver = function() {
		return this.sum() / 3;
	};
	return obj;
}

var scores = []; //new Array();
scores[0] = createScore("홍길동", 100, 100, 100);
scores[1] = createScore("임꺽정", 90, 90, 90);
scores[2] = createScore("유관순", 80, 80, 80);

for (var score of scores) {
    console.log(score.name, score.kor, score.eng, score.math,
            score.sum(), score.aver());
}

console.log("--------------------------------------------");

// 과목의 점수를 변경하더라도 합계와 평균은 다시 계산되기 때문에 편하다!
scores[2].kor = 100;

for (var score of scores) {
    console.log(score.name, score.kor, score.eng, score.math,
    		score.sum(), score.aver());
}
객체 - 객체 생성과 초기화 V
5) {} 문법을 이용하여 객체 생성
{} 표기법을 이용하여 객체 생성과 초기화를 수행한다.
function createScore(name, kor, eng, math) {
    return {
        "name": name,
        'kor': kor,
        'eng': eng,
        math: math,
        sum() {
            return this.kor + this.eng + this.math
        },
        aver() {
            return this.sum() / 3
        }
    }
}

var scores = []; //new Array();
scores[0] = createScore("홍길동", 100, 100, 100);
scores[1] = createScore("임꺽정", 90, 90, 90);
scores[2] = createScore("유관순", 80, 80, 80);

// 과목의 점수를 변경하더라도 합계와 평균은 다시 계산되기 때문에 편하다!
scores[2].kor = 100;

for (var score of scores) {
    console.log(score.name, score.kor, score.eng, score.math,
    		score.sum(), score.aver());
}
객체 - 객체 생성과 초기화 VI
6) 함수 외부에서 객체를 생성한 후 즉시 초기화시키기
new 명령 다음에 바로 함수를 호출한다.
function createScore(name, kor, eng, math) {
    // new 명령을 실행한 후에 이 함수를 호출하면
    // this 내장 변수에 그 생성된 객체 주소가 저장된다.
    // 이렇게 되면 이 함수 내부에서 객체를 생성할 필요가 없다.
    // this 내장 변수를 사용하여 객체를 사용하면 된다.
    this.name = name;
    this.kor = kor;
    this.eng = eng;
    this.math = math;
    this.sum = function () {
        return this.kor + this.eng + this.math;
    };
    this.aver = function () {
        return this.sum() / 3;
    };

    // 이 함수에서 객체를 생성하지 않았기 때문에
    // 객체를 리턴할 필요가 없다.
}

var scores = []; //new Array();
scores[0] = new createScore("홍길동", 100, 100, 100);
scores[1] = new createScore("임꺽정", 90, 90, 90);
scores[2] = new createScore("유관순", 80, 80, 80);

// 이렇게 new 명령을 통해 생성된
// 기본 객체를 초기화시키는 함수를 "생성자(constructor)" 라고 부른다.


for (var score of scores) {
    console.log(score.name, score.kor, score.eng, score.math,
        score.sum(), score.aver());
}

// 다음과 같이 생성된 객체를 초기화시키는 것이 아니라
// 객체를 생성하는 함수는
// "팩토리 함수(factory)"라 부른다.
function createScore2(name, kor, eng, math) {
    var obj = new Object();
    obj.name = name;
    obj.kor = kor;
    obj.eng = eng;
    obj.math = math;
    obj.sum = function () {
        return this.kor + this.eng + this.math;
    };
    obj.aver = function () {
        return this.sum() / 3;
    };
    return obj;
}
var obj = createScore2("홍길동", 100, 90, 80);
console.log(obj);
new 사용법

new 명령어에서 ① 빈 객체 생성된다. createScore("홍길동", 100, 100, 100) 에서 ② Object()가 자동으로 먼저 호출된다. 그러면서 기본 객체(프로퍼티 등)이 준비된다. 그 다음 ③ createScore() 실행된다. 여기서 name : "홍길동", kor : 100 등이 들어간다. createScore는 생성된 객체를 준비시키는 일을 하는 함수 "생성자(constructor)" 라고 한다.
객체 - 객체 생성과 초기화 VII
7) 생성자 역할을 하는 함수의 이름은 대문자로 시작한다.
생성자 이름은 객체의 용도를 표현하는 명사 형태로 짓는다.
자바스크립트는 생성자 문법이 따로 없기 때문에
함수의 이름을 대문자로 시작하여 다른 개발자에게 알려준다.
function Score(name, kor, eng, math) {
	this.name = name;
	this.kor = kor;
	this.eng = eng;
	this.math = math;
	this.sum = function() {
		return this.kor + this.eng + this.math;
	};
	this.aver = function() {
		return this.sum() / 3;
	};
}

var scores = []; //new Array();
scores[0] = new Score("홍길동", 100, 100, 100);
scores[1] = new Score("임꺽정", 90, 90, 90);
scores[2] = new Score("유관순", 80, 80, 80);

// 위와 같이 함수 이름이 대문자로 시작하면
// 생성자 역할을 하는 함수임을 직관적으로 알 수 있어 유지보수에 좋다.

for (var score of scores) {
		console.log(score);
    console.log(score.name, score.kor, score.eng, score.math,
            score.sum(), score.aver());
}
객체 - 객체 생성과 초기화 VIII
8) 객체에 대해 공통으로 사용하는 함수를 공유하기
function Score(name, kor, eng, math) {
	this.name = name;
	this.kor = kor;
	this.eng = eng;
	this.math = math;

	// sum(), aver() 함수는 객체의 데이터(국어,영어,수학 점수)를 다루는 함수다.
	// 즉 객체에 대해 사용하는 함수다.
	// 그런데 객체를 생성할 때 마다 함수를 만들어 저장한다면 메모리가 낭비된다.
	// 해결 방안?
	// => 객체에 대해 공통으로 사용하는 함수는 별도의 보관소에 저장한다.
	/*
	this.sum = function() {
		return this.kor + this.eng + this.math;
	};
	this.aver = function() {
		return this.sum() / 3;
	};
	*/
}

// 객체에 대해 공통으로 사용하는 함수는 생성자 객체에 보관한다.
// => 생성자 객체에 prototype 객체가 들어 있는데 여기에 보관해야 한다.

// 1) 자바스크립트 함수는 객체이다. 즉 "함수 = 객체 + 함수코드" 이다.
// 2) 각각의 함수 객체는 prototype 이라는 공용 저장소를 갖고 있다.
// 3) prototype에 저장된 프로퍼티는 그 함수를 통해 초기화된 모든 객체가 공통으로 사용할 수 있다.
Score.prototype.sum = function() {
	return this.kor + this.eng + this.math;
};

Score.prototype.aver = function() {
	return this.sum() / 3;
};

var scores = []; //new Array();
scores[0] = new Score("홍길동", 100, 100, 100);
scores[1] = new Score("임꺽정", 90, 90, 90);
scores[2] = new Score("유관순", 80, 80, 80);

for (var score of scores) {
		console.log(score);
    console.log(score.name, score.kor, score.eng, score.math,
            score.sum(), score.aver());
	  // 객체에서 sum(), aver() 함수를 찾는다.
		// 없으면, 그 객체를 초기화시킨 생성자의 prototype 보관소에서 찾는다.
		// 따라서 위의 sum(), aver() 함수는
		// Score.prototype 보관소에 들어 있는 함수를 호출하는 것이다.
}
생성자와 prototype
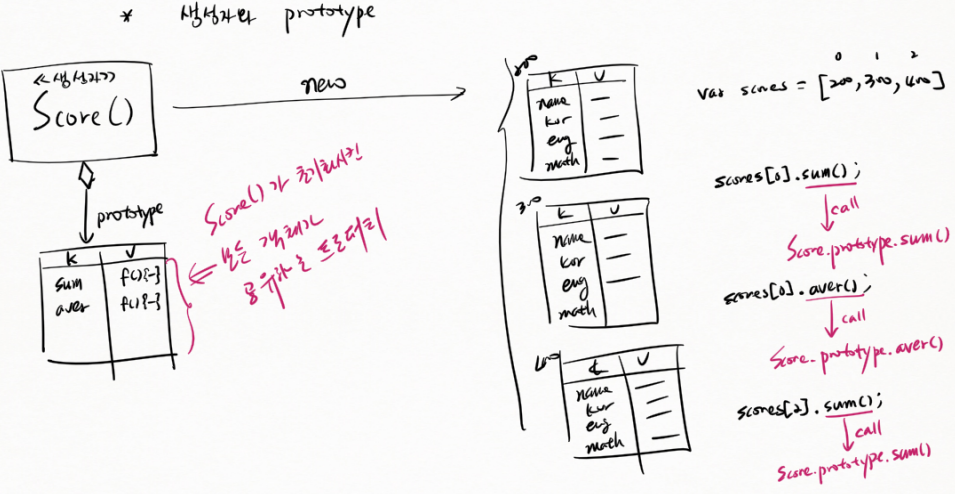
Score.prototype.sum = function() { - } 로 함수가 저장되고 Score() 가 초기화시킨 모든 객체가 공유하는 프로퍼티에 sum의 주소가 들어간다. avg도 마찬가지다.
var scores = [] 명령어로 빈 배열이 생성된다.
scores[0] = new Score("홍길동", 100, 100, 100) 명령어로 객체가 생성되고 배열 0번째에 그 주소 200이 들어간다.
이런식으로 배열 1, 2번째에 주소 300, 400 이 들어간다.
scores[0].sum() 을 입력했을때 scores[0] 의 주소인 200 에 가서 sum 함수가 있는지 찾는다. 없으면 score.prototype 이라는 보관소에 가서 sum() 을 찾고 있으면 호출한다. scores[0].aver() 도 마찬가지다. 나머지도 동일한 방법으로 호출된다.
생성자1 - 정의하는 방법
생성자는 그냥 일반 함수이다.
new 명령 다음에 즉시 함수를 호출하면 생성자로서 역할을 한다.
function f1() {
    // 자바스크립트는 생성자를 정의하는 문법이 따로 없다.
    // 일반 함수를 생성자처럼 사용한다.
    // => new 명령을 사용하여 외부에서 빈 객체를 생성한 후,
    // => 일반 함수를 호출하면 생성자가 된다.
}

// => new 명령 다음에 함수를 호출하면 생성자로서 역할한다.
var obj1 = new f1();
console.log(obj1);
console.log("-----------------------");

// new 명령없이 호출하면 일반 함수로 취급된다.
var obj2 = f1();
console.log(obj2);
생성자와 일반함수
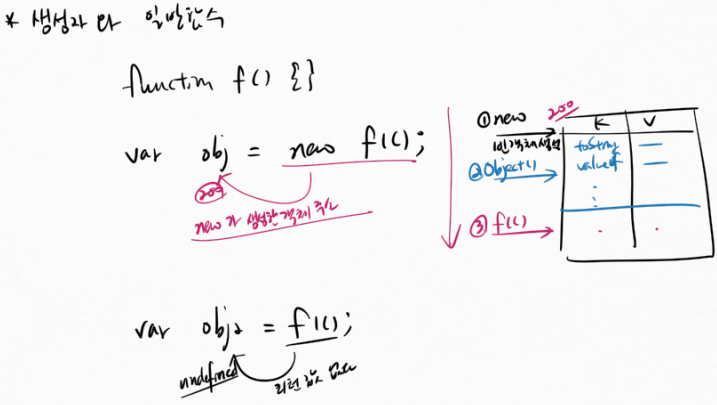
위 var obj = new f1() 명령어에서 new가 생성한 f1 객체 주소 200이 obj에 들어간다.
① new 명령으로 빈 객체 생성된다. ② Object() 객체에 의해 기본 프로퍼티가 추가된다. ③ f1() 명령으로 f1 프로퍼티가 추가된다.
var obj2 = f1(); 하게되면 f1 함수가 실행되는데 리턴 값 없다. 그래서 obj2에 undefined가 저장된다.
생성자2 - 일반함수로 동작할 때와 생성자로 동작할 때의 차이점
function f1() {
  console.log(this);
  // 생성자로 동작할 때는 this 내장 변수에 객체 주소가 들어 있다.
}

new f1(); // 생성자로 사용
console.log("-----------------------");

f1(); // 일반 함수로 사용
생성자3 - 객체의 생성자 정보
function f1() {
}

var obj1 = new Object();
var obj2 = new f1();

// 객체의 constructor 프로퍼티에는 생성자 정보가 들어있다.
// 그래서 해당 객체가 어떤 생성자를 통해 초기화 되었는지 알 수 있다.
console.log(obj1.constructor);  // [native code] : 자바스크립트가 만든 것으로 C로 되어 있다.
console.log(obj1);

console.log("-------------------------------");

console.log(obj2.constructor);
console.log(obj2);
생성자4 - 부모 생성자
function f1() {
  // 생성자에 상관없이 모든 객체는 Object() 생성자의 prototype 보관소를 공유한다.
}
function f2() { }
function f3() { }

var obj1 = new f1();
var obj2 = new f2();
var obj3 = new f3();

// f1(), f2(), f3() 생성자로 초기화시킨 객체 모두
// Object.prototype 보관소에 저장된 변수나 함수를 사용할 수 있다.
console.log(obj1);
console.log(obj2);
console.log(obj3);
console.log("----------------------------");

console.log(obj1.toString());  // Object.prototype.toString()
console.log(obj2.toString());  // Object.prototype.toString();
console.log(obj3.toString());  // Object.prototype.toString();
생성자와 Object()

왼쪽 그림은 다음과 같이 동작한다.
① new 명령어로 빈 객체 생성한다.
② f1() 의 수퍼 생성자(Object()) 호출
③ f1() 호출
오른쪽 그림 설명은 아래와 같다.
f1() 입장에서 Object() 는 super 생성자이다. Object() 입장에서 f1() 은 sub 생성자이다. f1()은 Object()를 자동 상속한다.
사실 Object() 의 함수는 Object() 내부에 들어있는게 아니라 Object() 의 prototype에 들어있다.
obj.toString() 하게되면
① 객체에서 찾는다.
② 생성자 f1.prototype 에서 찾는다.
③ super 생성자 Object.prototype 에서 찾는다.
생성자5 - 생성자 상속
function Engine(va, cy, cc) {
  // 상위 생성자를 호출하지 않으면 기본으로 Object() 생성자를 호출한다.
  // Object.call(this);
  this.valve = va;  // 밸브
  this.cylinder = cy;  // 실린더
  this.cc = cc;  // cc
}

var e1 = new Engine(16, 4, 2000);
console.log(e1);

function Car(va, cy, cc, ca, au) {
  // 상위 생성자를 명시적으로 호출한다.
  Engine.call(this, va, cy, cc);

  this.capacity = ca;  // 수용인원
  this.auto = au;  // 오토미션
}

var c1 = new Car(16, 4, 2000, 5, true);
console.log(c1);
생성자를 상속받기

왼쪽 그림은 다음과 같다.
f2(n, k, e, m) { 내부에서
f1(n) // 일반 함수 호출 방법으로는 f2()가 this로 따로 변수에 받아둔 객체 주소를 f1()에 전달할 방법이 없다.
f1.call(this, n) // this에 f2의 주소 200이 저장되고 f1의 this에 200이 전달된다.
var obj = new f2("홍길동", 100, 90, 80) 하게 되면 new로 빈 객체 생성되고 f2에 200이라고 객체 주소 전달 한다. 그 주소가 obj에 저장된다.
함수를 호출하는 방법
① 함수명(아규먼트, ...);
예) f1();
② 함수명.call(객체주소, 아규먼트, ...);
예) f1.call();
생성자와 컨베이어 벨트

new로 빈 객체 ① 생성 → f1(n) 으로 name 에 값 입력 → f2(n, k, e, m) 으로 kor, eng, math 값 입력되게 한다.
생성자를 체인으로 연결하듯이 super-sub 로 만드는 이유?
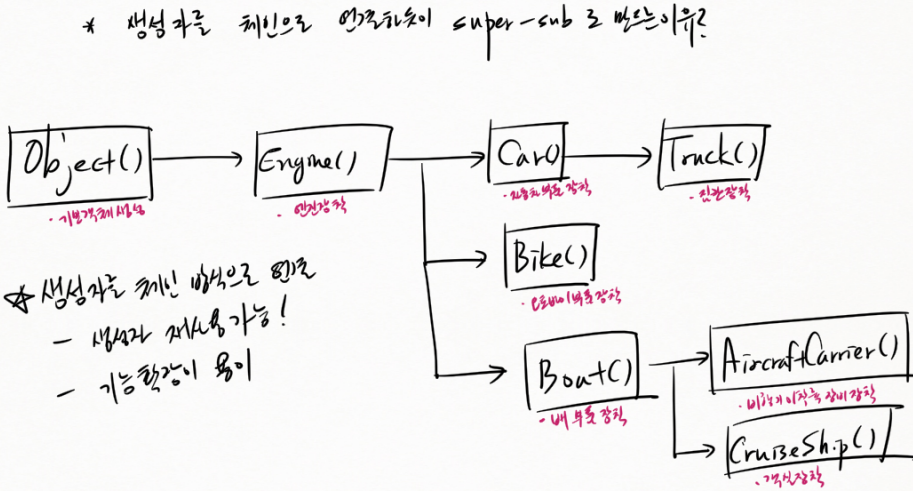
처음부터 모든 기능을 Truck() 에 넣어도 되지만 그러면 확장성이 떨어진다.
Object() 로 기본 객체 생성하고, Engine() 으로 엔진 장착, Car() 로 자동차 부품 장착, Truck() 으로 짐칸 장착을 한다. 이렇게 되면 Engine() 이후에 Bike() 로 오토바이 부품 장착, Boat() 로 배 부품 장착을 할 수 있다. Boat() 뒤에 AircraftCarrier() 로 비행기 이착륙 장비 장착, CruiseShip() 으로 객실 장착할 수 있다.
생성자를 체인 방식으로 연결하는 이유는
- 생성자 재사용 가능!
- 기능 확장이 용이
생성자 호출 예:

new Car() 하게 되면 생성 및 초기화가 진행된다. 빈 객체가 생성되고 Car() 의 this에 주소 200이 부여된다. Car() 함수 내부에 Engine.call(this, va, cy, cc) 문장으로 Engine() 에 this 주소 200이 전달된다. 그러면 Engine() 은 다시 Object() 를 call 하고 Object() 의 this에 주소 200이 전달된다. Object() 는 주소 200을 초기화한다. 그 후 Engine() 이 주소 200을 초기화한다. 그 후 Car() 가 주소 200을 초기화한다.
생성자6 - 생성자 상속과 prototype 연결
// ex04\exam11-6.html

// 생성자 정의
function Engine(valve, cylinder, cc) {
  // Object.call(this);
  this.valve = valve;
  this.cylinder = cylinder;
  this.cc = cc;
  this.info = function () {
    console.log("비트캠프 엔진!");
  }
}

// Engine 객체 생성
let e1 = new Engine(16, 4, 2000);

// Object.prototype에 프로퍼티 추가
Object.prototype.test = function () {
  console.log("Object.test() 호출됨!")
};

// Engine.prototype에 프로퍼티 추가
Engine.prototype.print = function () {
  console.log("Engine.prototype.print():")
  console.log("  밸브: " + this.valve);
  console.log("  실린더: " + this.cylinder);
  console.log("  cc: " + this.cc);
};

// 함수 호출과 prototype의 관계를 알아보자!

e1.info();
// Engine.info()

e1.print();
// e1.print()
// --> Engine.prototype.print()

e1.test();
// e1.test()
// --> Engine.prototype.test()
// --> Object.prototype.test()

console.log(e1.toString());
// e1.toString()
// --> Engine.prototype.toString()
//     --> Object.prototype.toString()

// e1.haha();  // 실행 오류!
// e1.haha()
// --> Engine.prototype.hah()
//     --> Object.prototype.haha()
//         --> null

console.log(e1);
// 위에서 변형

// 생성자 정의
function Engine(valve, cylinder, cc) {
  // Object.call(this);
  this.valve = valve;
  this.cylinder = cylinder;
  this.cc = cc;
}

function Car(valve, cylinder, cc, capacity, auto) {
  Engine.call(this, valve, cylinder, cc);

  this.light = false;
  this.capacity = capacity;  // 수용인원
  this.auto = auto;  // 오토미션
}

// prototype에 프로퍼티 추가

// Object.prototype에 프로퍼티 추가
Object.prototype.test = function () {
  console.log("Object.test() 호출됨!")
};

// 2) Engine.prototype에 프로퍼티 추가
Engine.prototype.print = function () {
  console.log("Engine.prototype.print():")
  console.log("  밸브: " + this.valve);
  console.log("  실린더: " + this.cylinder);
  console.log("  cc: " + this.cc);
};

// 3) Car.prototype에 프로퍼티 추가
Car.prototype.setLight = function (light) {
  console.log("Car.prototype.setLight():");
  this.light = light;
};

// Car 객체 생성
var c1 = new Car(16, 4, 2000, 5, true);

c1.setLight(true);
// c1.setLight();
// --> Car.prototype.setLight()

// c1.print(true);
// c1.print();
// --> Car.prototype.print()
//     --> Engine.prototype.print()  // 오류!
//         왜? Car.prototype의 상위 생성자는 Object.prototype이다.

c1.test();
// c1.test();
// --> Car.prototype.test()
//     --> Object.prototype.test()
// 위에서 변형

// 생성자 정의
function Engine(valve, cylinder, cc) {
  // Object.call(this);
  this.valve = valve;
  this.cylinder = cylinder;
  this.cc = cc;
}

function Car(valve, cylinder, cc, capacity, auto) {
  Engine.call(this, valve, cylinder, cc);

  this.light = false;
  this.capacity = capacity;  // 수용인원
  this.auto = auto;  // 오토미션
}

// prototype에 프로퍼티 추가

// Object.prototype에 프로퍼티 추가
Object.prototype.test = function () {
  console.log("Object.test() 호출됨!")
};

// 2) Engine.prototype에 프로퍼티 추가
Engine.prototype.print = function () {
  console.log("Engine.prototype.print():")
  console.log("  밸브: " + this.valve);
  console.log("  실린더: " + this.cylinder);
  console.log("  cc: " + this.cc);
};

// 3) Car.prototype에 프로퍼티 추가
// 예전 방식:
// => Car() 생성자가 Engine() 생성자를 상속 받을 때는
//    Car의 prototype이 Engine의 prototype도 상속 받아야 한다.
//    그래야만 Car()로 초기화시킨 객체에서 Engine.prototype에 들어 있는 함수를 사용할 수 있다.
// => 기존의 Car의 prototype 객체를
// Engine의 prototype 객체의 복제품으로 교체한다.
Car.prototype = Object.create(Engine.prototype);

// Engine 의 prototype을 복제해서
// Car의 prototype을 만들었기 때문에
// constructor 가 Engine으로 되어 있다.
// 생성자 정보를 변경해줘야 한다.
Car.prototype.constructor = Car;

Car.prototype.setLight = function (light) {
  console.log("Car.prototype.setLight():");
  this.light = light;
};

// Car 객체 생성
var c1 = new Car(16, 4, 2000, 5, true);

c1.setLight(true);
// c1.setLight();
// --> Car.prototype.setLight()

// c1.print(true);
// c1.print();
// --> Car.prototype.print()
//     --> Engine.prototype.print()  // 오류!
//         왜? Car.prototype의 상위 생성자는 Object.prototype이다.

c1.test();
// c1.test();
// --> Car.prototype.test()
//     --> Object.prototype.test()

console.log(c1);
// 위에서 변형

// 생성자 정의
function Engine(valve, cylinder, cc) {
  // Object.call(this);
  this.valve = valve;
  this.cylinder = cylinder;
  this.cc = cc;
}

function Car(valve, cylinder, cc, capacity, auto) {
  Engine.call(this, valve, cylinder, cc);

  this.light = false;
  this.capacity = capacity;  // 수용인원
  this.auto = auto;  // 오토미션
}

// Car.prototype을 상위 생성자인 Engine.prototype과 연결한다.
Object.setPrototypeOf(Car.prototype, Engine.prototype);

// prototype에 프로퍼티 추가
Object.prototype.test = function () {
  console.log("Object.test() 호출됨!")
};

Engine.prototype.print = function () {
  console.log("Engine.prototype.print():")
  console.log("  밸브: " + this.valve);
  console.log("  실린더: " + this.cylinder);
  console.log("  cc: " + this.cc);
};

Car.prototype.setLight = function (light) {
  console.log("Car.prototype.setLight():");
  this.light = light;
};

// Car 객체 생성
var c1 = new Car(16, 4, 2000, 5, true);

c1.setLight(true);
// c1.setLight();
// --> Car.prototype.setLight()

c1.print();
// --> Car.prototype.print()
//     --> Engine.prototype.print()

c1.test();
// c1.test();
// --> Car.prototype.test()
//     --> Object.prototype.test()

console.log(c1);
수퍼 생성자의 prototype 사용하기
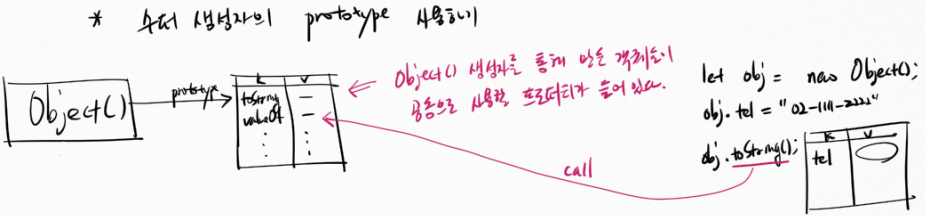
Object() 의 prototype에 Object() 생성자를 통해 만든 객체들이 공동으로 사용할 프로퍼티가 들어있다.
obj 라는 변수명으로 객체 생성하고 obj.toString() 하게 되면 Object.prototype 내부의 프로퍼티를 call 한다.
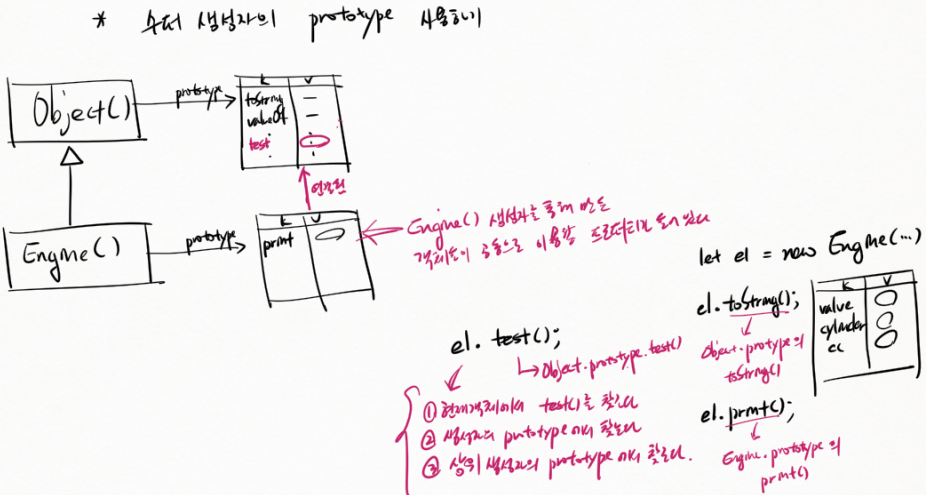
Engine() 의 prototype 에는 Engine() 생성자를 통해 만든 객체들이 공동으로 이용할 프로퍼티가 들어있다. 이는 Object() 의 prototype 과 연결된다.
우측 그림의 e1.toString() 하게 되면 Object.prototype의 toString() 을 호출한다.
e1.print() 하게되면 Engine.prototype의 print() 를 호출한다.
e1.test() 하게 되면 Object.prototype.test() 를 찾는데, 과정은 다음과 같다.
① 현재 객체에서 test() 를 찾는다.
② 생성자의 prototype 에서 찾는다.
③ 상위 생성자의 prototype 에서 찾는다.
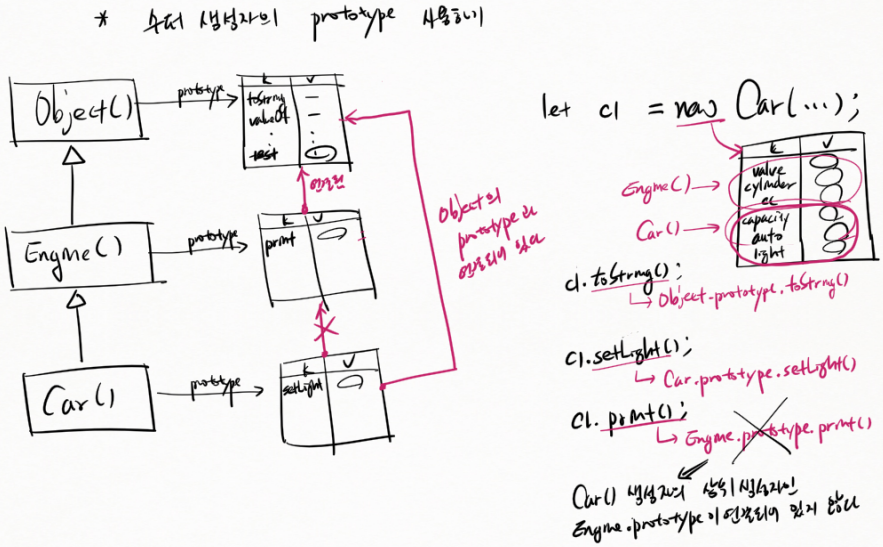
Car() 를 생성하고 Engine.call(this) 해도 prototype은 Object의 prototype과 연결되어 있다.
let c1 = new Car(...) 명령어로 new에 의해 빈 객체 생성, Engine() 에 의해 프로퍼티 추가, Car() 에 의해 프로퍼티 추가된다.
c1.toString() 하게 되면 Object.prototype.toString() 을 호출한다.
c1.setLight() 하게 되면 Car.prototype.setLight() 을 호출한다.
c1.print() 하게 되면 Engine.prototype.print() 을 호출하지 못한다. Car() 생성자의 상위 생성자인 Engine.prototype이 연결되어 있지 않다.
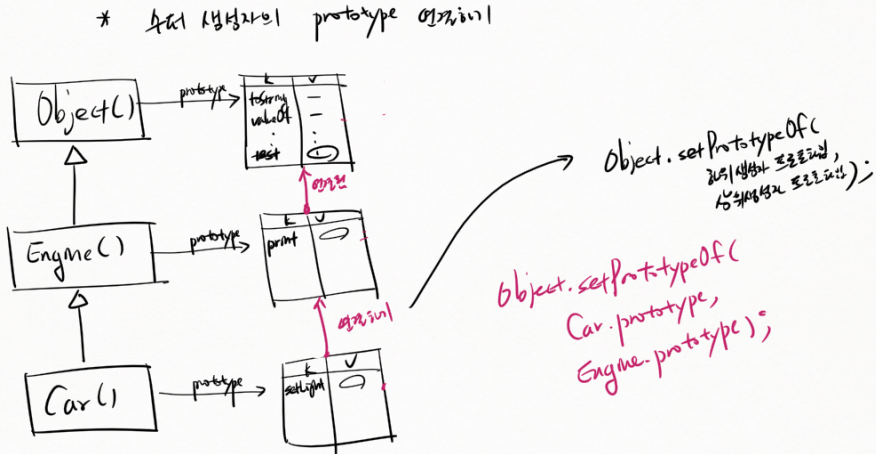
Car() 의 수퍼 생성자의 prototype 을 연결하는 방법이다.
Object.setPrototypeOf( 하위 생성자 프로토타입, 상위 생성자 프로토타입 ) 을 사용한다.
Car() 에서는 Object.setPrototypeOf(Car.prototype, Engine.prototype) 와 같다.
생성자7 - 생성자: typeof, instanceof
typeof : 타입을 알려준다
instanceof : 객체를 초기화 시키는데 참여한 생성자인지 검사한다.
// 생성자 정의
function Engine(valve, cylinder, cc) {
  // Object.call(this);
  this.valve = valve;
  this.cylinder = cylinder;
  this.cc = cc;
}

function Car(valve, cylinder, cc, capacity, auto) {
  Engine.call(this, valve, cylinder, cc);

  this.light = false;
  this.capacity = capacity;  // 수용인원
  this.auto = auto;  // 오토미션
}

Object.setPrototypeOf(Car.prototype, Engine.prototype);

// Car 객체 생성
let obj = new Object();
let engine = new Engine(16, 4, 2000);
var car = new Car(16, 4, 2000, 5, true);

// typeof 연산자
console.log(typeof obj);  // object
console.log(typeof engine);  // object
console.log(typeof car);  // object
console.log("---------------------------")

// instanceof 연산자
// => 객체를 초기화시키는데 참여한 생성자인지 검사한다.
console.log(obj instanceof Object);  // true
console.log(obj instanceof Engine);  // false
console.log(obj instanceof Car);  // false
console.log("---------------------------")

console.log(engine instanceof Object);  // true
console.log(engine instanceof Engine);  // true
console.log(engine instanceof Car);  // false
console.log("---------------------------")

console.log(car instanceof Object);  // true
console.log(car instanceof Engine);  // true
console.log(car instanceof Car);  // true
console.log("---------------------------")
조언
*금방 만들수 있으면 먼저 만들고 나중에 리팩터링 고민하라.
*제작 1일, 버그 잡는데 3일 vs 제작 2일, 버그 픽스 1일 -> 전자가 낫다.
*for문으로 20줄 만들수 있는걸 if else로 200줄 만들어도 빨리 할 수 있으면 200줄로도 만들어라. 나중에 리팩터링 하면 된다.
*검색시 다른 개발자 블로그를 먼저 찾아라.
*날 것에서 모델링해서 단순화 할수록, 즉 추상화를 잘할수록 연봉이 올라간다.
*개발 실력, 강의, 책 조건이 충족되어도 영어 못하면 해외 기업 이직 기회 놓친다.
*SI 10년차는 넓게 기술 알고 빠르게 기능 만드는 사람 원한다. 네카라쿠배 Technical Leader 자리에 개발자 10년차를 원할때는 기술의 깊이를 잘 아는 사람을 원한다.
과제
/
'네이버클라우드 AIaaS 개발자 양성과정 1기 > Javascript' 카테고리의 다른 글
| [비트캠프] 28일차(6주차3일) - Javascript(이벤트: 등록, 정보 다루기, 전파, 기본 동작 중지) (0) | 2022.12.14 |
|---|---|
| [비트캠프] 27일차(6주차2일) - Javascript(캡슐화, DOM API: 태그 찾기, 알아내기, 속성 변경, 추가, 변경, 삭제) (0) | 2022.12.13 |
| [비트캠프] 25일차(5주차5일) - Javascript(함수, 비동기, 주요함수, JSON) (0) | 2022.12.09 |
| [비트캠프] 24일차(5주차4일) - Javascript(함수: 정의, closure, arrow function) (0) | 2022.12.08 |
| [비트캠프] 23일차(5주차3일) - Javascript(배열, 반복문, destructuring) (0) | 2022.12.07 |


